
Collection: Quick Start Guide - Cocoa Melanger
Dear Customer,
We are glad to welcome you into the folds of the Cocoa family.
Let us congratulate you, on your wonderful choice of purchasing a Cocoa Nut Butter Grinder - Commercial Tilting Grinder, the very best in India. We hereby intend to familiarize you with the procedures required to operate and maintain the device.
Our latest product has been conceived with intention of reducing the work load in the kitchens of hotels and other commercial establishments.
The Tilting Grinder, the pride of our stables, has been crafted with precision and quality, with non-corrosive components, and it has also been designed taking ergonomic aspects into consideration. Low on noise and vibration, it has especially been built to handle the high volumes of output generated in less time as required of a commercial establishment like that of yours.
With easy operating and maintenance procedures as has been completely detailed in this manual, it is our desire that you make the best of what our Tilting Grinder has to offer you. Do feel welcome to write to us with your suggestions.
FEATURES
- A functional and utility oriented design.
- Detachable drum and dual cylindrical back stone rollers, to facilitate cleansing.
- Cylindrical rollers ensure powerful and perfect grinding.
- Tilting facility with a locking arm to hold the drum while grinding and cleaning.
- Easy operability
- Provision of fiber lid to maintain hygiene while grinding.
- Powerful motors ensure a higher rate of speed while grinding.
- Tilting provision ensures easy disposal of Chocolate.
- Low noise and vibration.
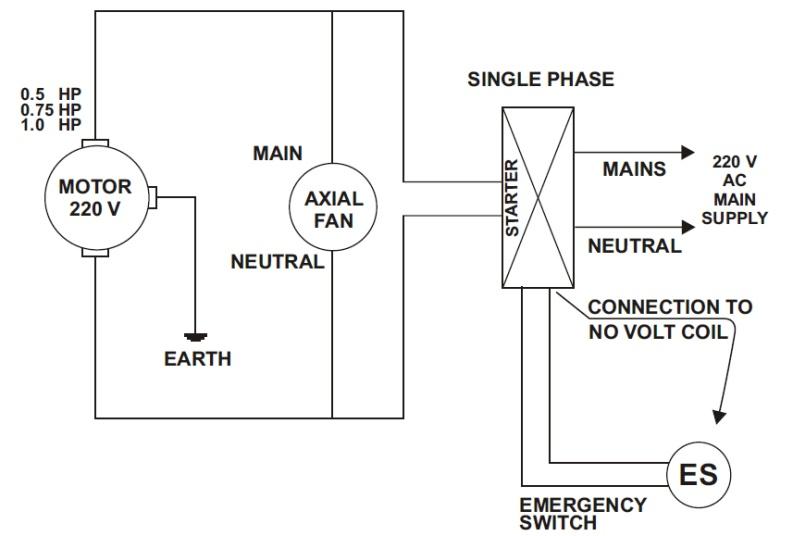
ELECTRICAL CIRCUIT DIAGRAM

WIRING DIAGRAM (WITH STARTER)
ELECTRICAL INSTALLATION WITH SPEED CONTROLLER
- The Input plug of the Melangeur to be plugged to the speed controller unit.
- Input plug of the speed controller to be plugged to a single phase wall socket.
- In case the wall socket is different to the plug provided in the speed controller a suitable adaptor is to be used.
- In case a suitable adaptor is not available then get the help of a trained Electrician to change the plug.
- Two Input plug of Grinder to be plugged to respective socket in Controller.
- Turn ON power supply to Controller and Switch ON the Controller and allow the grinder to rotate using controller knob in Controller.
- By rotating clockwise it will increase the speed of grinder and rotating in anti-clockwise direction can reduce the Speed of the motor.
WHEN YOU UNPACK THE FIRST TIME
- Dispose the wrapping and packing material in accordance with your local laws and keeping the safety of the environment in mind.
- Keep the wrapping and packing materials away from children to avoid risk of suffocation and choking.
- Any damages or issues should be brought to notice of the seller immediately and the delivering freight company notified. Please keep all the packing materials intact for inspection.
- The grinder needs to be cleaned to remove the manufacturing dust.
- Run the machine with 1/2kg of sugar for about 1 hour and throw away the content. Rinse the machine thoroughly and let it dry completely before using.
SUITABLE FOR
- Chocolate Paste
- Cashew, Almond Butter
- Peanut Butter
- Idly/Dosa, Voda Batter
- Curry Paste
- Chutneys
- Dips & Sauces
- Ginger Garlic Paste
- Coconut Paste & Milk
RECOMMENDED QUANTITY
For Roasted Broken Peanuts, Cashew Nuts and Cocoa Beans (Skin Removed):- Cocoa Mel can grinds up to 75 lbs of Cocoa maximum quantity of and allow ingredient to grind up to required Consistency.
- At initial check if it is seated property and also ensure that the rollers have been latched tightly.
- If the materials gets packed to one side or gets clumpy the rollers will not rotate, in such cases, switch off open the lid and spread the material evenly around the drum and start the machine.
For Chocolate with ratio of 20% Cocoa liqueur 10% cocoa butter 35% sugar 35% powered milk or 40 cocoa liqueurs and 60% sugar:- Cocoa 100 can grinds up to 75 lbs and allow ingredient to grind up to required consistency.
- Add cocoa liqueur in initial start, after 5 minutes of grinding add sugar, cocoa butter, after 10-15 minutes of grinding add powdered milk.
- Do not dump all the materials in the initial start and the rollers have been latched tightly
IMPORTANT POINTS TO BE NOTED WHILE GRINDING
- Hen grinding whole nuts, or any slightly larger pieces the roller might not rotate for about 2 to 3 minutes and will turn into normal rotation condition once the grinding material have broken into fine pieces.
- Always ensure to fix the roller stone first and lock the latch before adding the materials to be grind.
- Never start the machine without lock, must always be locked.
- Never remove the roller stone from the drum during the course of grinding.
- In case if you feel you have overloaded the machine, remove the entire quantity and fix the roller stone unit with locked and then gradually add the materials.
- We never recommend quantity more than above specified limit.
OPERATION INSTRUCTION
- The appliances must be placed on the floor.
- Place the roller stones set in drum, check if it is seated property and also ensure that the rollers have been latched tightly.
- Do not fully load the material before starting the machine.
- Switch ON the grinder switch and allow the grinder to run.
- Slowly add materials after starting the machine. This will avoid overloading the unit. Use little water if necessary.
- Close the lid for hygiene while grinding.
- Continue to run the grinder until desired paste consistency is reached.
- To check the consistency, switch off the machine and open lid.
- Once the desired consistency is reached, turn away the safety lock near the drum on top.
- Pull the lever by side to allow the container to flow into the container at bottom and ensure that the container is placed properly.
MAINTENANCE AND UPKEEP
Utmost care should be taken to preserve the working of the grinder and hence regular maintenance is must. Please follow the instruction to do so.
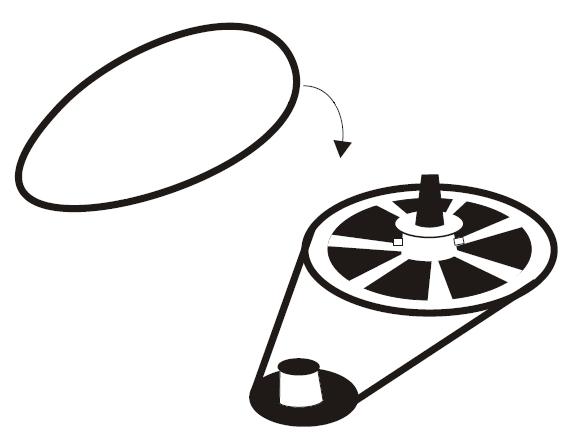
REPLACING THE DAMAGES BELT
- Turn the safety lock away, pull the lever down and tilt the grinder completely.
- Now, remove the screws that hold the long plate by side of the drum.
- Now you can remove the perforated steel cover behind the bottom drum.
- Remove the damaged belt which is now visible, and replace it with a new one.
- Place the perforated steel cover as before.
- Lay the long plate by the side and screw in the bolts.
WASHING PROCEDURE
- After removing the paste add waste to grinder and run the same for 2 minutes.
- This is to ensure that any paste sticking to inner sides is removed.
- Do not clean by spraying water from pipe or hose. This may damage the motors and working of the grinder.
- Do not use any abrasive powders to clean, as this leaves marks and scratches on the body of the grinder.
CHANGING THE OIL
- Remove the drum by releasing the locking latch.
- Unscrew the bolts that hold the cover on top of the bottom drum.
- Remove the screws that hold the gear box and take the gear box cover away.
- Now you may replace the oil.
- Tighten the screws as before on top of the gear box, and finally placing the cover back over the bottom drum, you may tighten them.
- Replace the drum, on the shaft to keep it ready for grinding.
SAFETY
- Use ideal power supply to run the grinder and do not use low voltage, this may damage the motor.
- Install a starter for three phase machine.
- Always use well trained service professionals attempt to correct the malfunction.
- Do not place your hand inside the drum while the grinder is in operation, always use the spatula.
- Keep the unit away from the children at all times, and especially while under operation.
CAUTION
- This appliances is intended to be used in household and similar appliance such as: A)Staff kitchen areas in shops, office and other working environments, Farm houses B)By clients in hotels, motels, other residential type environments.
- This appliance is not intended for use by persons (including children) with reduced physical, sensory or mental capability or lack of experience and knowledge unless they have been given supervision or instruction concerning use of the appliance by a person responsible for their safety.
- Children should be supervised to ensure that they do not play with the appliance.
- Switch off the appliance and disconnected from power supply before changing accessories or approaching parts that move in use.
- Never use hot or warm water for cleaning the drum. Always use cold water for cleaning the drum.
- Do not make the contents too watery to avoid spilling and splashing.
- Do not add ore materials that the unit can handle, use several smaller batches instead.
TROUBLESHOOTING
- If there is power failure while the grinder is runner, switch off the grinder. Before restarting check the consistency of grind material. If the paste is found too thick add required water if necessary and then turn ON.
- If there is difficulty in rotating remove a certain quantity of material from the drum and switch ON, add back slowly.
- Do not add additional un-grind food material to the already grind paste.
- As far as possible, start the grinder with only little materials and progressively add more. This will avoid overloading the unit.
- If the power card is damaged, it must be replaced by qualified persons to avoid electrical hazards.
Specially for chocolate Enthusiasts
- Your Cocoa commercial grinder can grind up to 75 lbs of Cocoa
- You can reach up to 15 to 25 microns somewhere between 24 to 36 hours depending on your particular conditions and desires.
Refining your chocolate with your Cocoa Melanger
- Ensure to keep your grinder completely DRY before using for chocolate.
- Even a little bit of water may ruin entire batch leaving thick fudge like mass that cannot be refined in the grinder.
- Always ensure to have a ratio of A) 40% cocoa liqueur, 60% sugar OR B) 20% cocoa liqueur, 10% cocoa butter, 35% sugar 35% powered milk.
- The sugar you add should be regular white cane sugar. Do not use powdered sugar which contains cornstarch. You can always use blender to reduce the size or powder your own sugar.
- Pre-grinding you sugar will save 2 or 3 hours of time in the grinder. If you find it too hard, just don’t bother the grinder will handle crystals of sugar.
- If you are using brown sugar, it should be completely dried before being used.
- We do not recommend honey, malt powder, milk cream in liquid form, condensed milk, water, unroasted nuts, unroasted cocoa nibs fresh fruits or dried fruits.
- Cocoa liqueur contains about 50% of cocoa butter and the amount of cocoa butter helps the chocolate flow smoothly while refining.
- Too little cocoa butter may make the chocolate clumpy around the rollers and may even damage the grinder. You may even go for 20% cocoa butter for smooth flowing of chocolate.
- If the paste is found too thick during the course of grinding, a standard hair dryer can be used to add heat.
- Optionally, you can pre-heat all your ingredients in a warm oven to about 140F/60C which will allow the grinder to work more easily.
- Always check for moisture formed in the lid after 3-4 hours of grinding. The moisture can run into your chocolate and ruin the batch. Switch OFF, wipe the lid thoroughly and start the machine.
- Your chocolate must be flowing smoothly between the rollers; if you find any problem then it would be a wrong method of grinding, read the instructions carefully and check recommended quantity information.